Sunday, September 29, 2013

Princeton Chapter of American Sewing Guild Celebrates National Sewing Month with Governor Christie's Blessings


In a letter from the State of New Jersey, Governor Chris Christie said, "I applaud the American Sewing Guild for encouraging individuals to come together in their communities to meet new people and to learn this important craft (of sewing)."  It is always an honor to be recognized for community service, and it was definitely a treat to be thanked by our state leader.  His letter will be an important page in the Princeton Chapter history scrapbook.

In addition to receiving this gracious letter, members of the Princeton Chapter of the American Sewing Guild celebrated National Sewing Month with Neighborhood Group special events, an elegant display of treasures at the Pemberton Library, and the popular Make-It-and-Take-It day.


More than twenty members of the American Sewing Guild gathered in the story book setting of Grace Episcopal Church in Pemberton, New Jersey.  Members socialized, enjoyed a catered lunch, and completed six sewing projects on a beautiful summer Saturday on September 21, 2013.

The annual Make-It-and-Take-It event is always a favorite.  ''Members like to be able to learn how to make several projects in one day," is how Kathy, the event's organizer, describes what makes this event often sell out soon after announcement.  Having this class in the fall affords members plenty of time to create any of the demonstrated projects at home in time for holiday gift giving.

  The lively atmosphere in the church hall was due to the structure of the event, which is similar to speed dating or musical chairs.  Members arranged their sewing machines in small groups, and six instructors rotated between the groups.  Each instructor had only forty-five minutes to present an example of her completed project, distribute written instructions and supply kits, and guide her students in the construction of the projects.


 This adorable little wallet (above) was quickly assemble from a few pieces of fabric and string or a pony tail elastic (below).

The instructor used her wallet to carry tea bags and sugar.


 I immediately moved my ID and money into mine.


Next, we created this adorable draw string tote from two squares of pretty woven cotton, ribbon, and two buttons.


Since our instructor made hers from this festive fabric, it was natural to think these could be re-usable gift bags, or convenient holders for seasonal cookie cutters or craft supplies.


The large pockets on the front and back of the bag could be closed with velcro or buttons.


These cute quilted pot holders made using insulated batting will bring smiles to Jersey Girls when presented as hostess gifts.


Our caterer, Chris, prepared a delicious lunch as always.  We had an abundance of baked chicken, stir fried vegetables, green salad with blue cheese, mashed potatoes, iced tea, and an assortment of desserts.  Our president introduced the officers/nominees, and invited all to our private Facebook Group.


After lunch, we discovered the secret to these trendy fabric flowers was to combine yo-yos, hand sewing, and glue.  We were planning to make more of these while we watch television (sewing shows, of course).


Then we made these multi-pocket pouches that were designed to attach to clothes hangers during travel.  Our instructor stated we could hide jewelry/passports in the pockets of these handy bags, and then place a sweater over the hanger and bag.  She also made sure we all wrapped our corners during construction, creating the perfect ninety degree angles shown in her sample (below).


Our final project was this practical pair of gauntlets.  Our instructor encouraged us to embellish our fingerless gloves with scraps of fleece.  She recommends keeping extra pairs in your car to give to friends (or strangers) whose uncovered hands may get cold.


I am looking forward to making these projects again, as well as sewing with other members at next year's Make-It-and-Take-It.

++++++++++++++++++++++++++++++++++++++++++++++++++++++++++++++++++

Neighborhood Groups of the Princeton Chapter of American Sewing Guild celebrated National Sewing Month in unique ways.


Aaron Wheeler, Vitas Hospice social worker, receiving walker bags from Ellen Nobles-Harris.  The Princeton Rip Stitchers and their families completed twenty-nine bags for their annual American Sewing Guild charity project.


It is a wonderful feeling to use our skills to help others maintain some independence.  What stylish and well constructed bags! 

Ellen Nobles-Harris, Peg Miller, Dottie Collins and Donna Elliot displaying 29 walker bags made for Vitas Hospice.  Not pictured:  Jane Shea (photographer) and Ruth Derr.

Trivia:  The photo in the background is Peg Miller's high school graduation photo.  She turned 88 in August.

+++++++++++++++++++++++++++++++++++++++++++++++++++++++++++++++

The Sew What Neighborhood Group celebrated National Sewing Month by celebrating their four birthday as a evening Neighborhood Group meeting.  They had a new member attend and all discussed what they love about sewing.  Their demonstration was a hands-on interactive demo of English Paper Piecing and the Grandmother's Flower Garden Quilt design. 

+++++++++++++++++++++++++++++++++++++++++++++++++++++++++++++++++


Tuesday, September 3, 2013

The good, the bad, and the ugly


The good news is this quilt was awarded a ribbon at the Mercer County Fair in New Jersey.  The design was purchased from Hoop Sisters, a digital embroidery design company.                                                                                                    
   This is their whole earth design, which I made into a wall hanging of five inch blocks.  Other students in my class made this design using larger embroidery hoops; their designs were less dense, and resulted in quilts large and soft enough to cover beds.           
               
I brought this design to the Fair because I wanted to show others this interesting urban graphic style.  The designers were able to create a 3-D look even though they specified the wall hanging could be stitched with only one color thread.  The secret was to applique the sphere using a different color from the background of the rays in the inner border.  Even if the applique was not used (similar to a whole cloth style quilt), the wall hanging would have visual depth due to closely packing stitches at the edges of the circle.

The bad news is my sloppy binding on the reverse side of the wall hanging did not escape the judges' notice.

Which brings us to the ugly, Husqvarna's recently redesigned wide binding foot.  Although it is scary looking, it snaps onto the sewing machine ankle; similar to most of their other attachments, a screw driver is not required.  I loaded the pre-folded and pressed binding before pushing the foot onto the sewing machine's ankle.  The foot worked best when I used my right hand to support the binding fabric while sewing;  a Husvarna dealer recommends loading the fabric into the slot on the right side of the foot, but I had better results loading the foot as intended by the engineers.  I also found this works best for low loft batting.

 Here is a dealer demonstration of the foot 

With practice and this new binding foot, I am planning to be an expert binder.

Thursday, August 15, 2013

Easy Upcycled Cathedral Window Bath Mat

I was inspired by the Husqvarna Free monthly project for July to try the circle attachment for my serger, so I cut 10 inch diameter circles from an old mattress pad.                                                                                                                                            Then, I centered a four inch ruler on each circle, and marked around the ruler.  I also marked one inch around the ruler.  This outer square is the sewing line; I used pins to align the corners before sewing.  I connected these circles in a 3 by 4 arrangement.                                                                                                                                               Next, I used the four inch ruler to cut a square for the center of each circle.  This fabric was upcycled from an old bed sheet.                                                                                                                             I placed a square in the center of each circle, then folded the curved edges toward the center of the square, and stitched the curved edges to the squares.


Here is the finished results.  It doesn't slip when I stand on it.

The Husqvarna project is more polished, and would be nice in a living room or bed room;  here is the link for their picture and directions - http://new.husqvarnaviking.com/en-US/Be-Inspired/Blog/July-2013/FREE-Monthly-Project-Circle-of-Fun-Cathedral-Pill


Tuesday, July 30, 2013

Cool Ties for Oklahoma Storm Victims - Sew a High Tech New American Bandana for Charity

This month, Princeton American Sewing Guild Members will be sewing 'cool ties' to be donated to Oklahoma storm victims.  They have requested this item, since restoring power is taking time, and southern summers can be hot without air conditioning and electric fans.  The Hamilton Sewing Challenge is expecting to join  Browns Mills Sew Little Time at the Pemberton Library on August 6th, 6-8pm to work on this charity project.
Cool ties are woven cotton scarves that are filled with Miracle Grow Moisture absorbing beads.  The beads are made of nylon, and look like coarse salt.  These beads were designed to hold moisture when mixed with potting soil, but can increase cooling through evaporation when the cool ties are soaked in water before wearing.  I purchased a small bag of Miracle Grow Moisture Absorbing Beads at the hardware store for about $8.

Cool ties are so easy and fast to make, that you may want some for your family, too.  Since they only require 4" of 45" fabric, I used left over to create my cool tie.  Our completed item will be similar in size and shape to a rectangular neck tie.
  1. Put selvages of fabric together, and straighten cut edges.  Next cut a 4" strip from fold to selvage.
  2. With wrong sides together, fold cut fabric in half lengthwise, and press.   Serge or overcast about 1/4" on the long side and on one short edge.  Turn fabric tube right side out, and press.
  3. Fold cool tie in half, and mark the middle with a pin.  Use additional pins to mark about 7.5" on either side of center.
  4. Sew from short edge to short edge at the pin closest to the sewn end.  This will prevent moisture pellets from migrating to the tip of the scarf
  5. Next place a few teaspoons of moisture pellets in the open end of the scarf.  Work the pellets toward the center of the scarf.  This could get messy, and you may want to do this step out side.  I found a small thread cone made a handy funnel for the moisture beads.
  6. Sew the remaining end of the cool tie closed.  Work the moisture beads towards the center, then sew across the scarf at the second 7.5" pin mark.  Sew across the center of the scarf, dividing the moisture beads into equal volumes in each half of the cool tie.
Here is the care label:

    • immerse in cold water approx 60 min, until crystals become gel
    • tie around head or neck
    • regenerate by soaking 1-3 minutes
    • do not freeze
    • dehydrate to store
    • hand wash only, mild soap

Thursday, July 18, 2013

All laced up at Pemberton Public Library on Saturday, July 13, 2013

Nearly twenty members of the American Sewing Guild assembled in New Jersey for a day to learn about and practice using combination sewing and embroidery machines to create free standing lace.  Attendees came from New Jersey, Pennsylvania, and Florida for this Princeton Chapter event.  American Sewing Guild members are welcome to attend events presented by any Chapter, as well as national events.


Free standing lace is a thread design that may be stitched over fabric, or may be stitched over wash away stabilizer.  Wash away stabilizer (sometimes called 'vilene') is a fabric that sometimes looks and feels similar to plastic sandwich wrap.  This fabric is placed in an embroidery hoop that is attached to the sewing machine.  The machine creates stitches according to the design the seamstress selects.  After the stitching is complete, the seamstress removes the fabric from the hoop, uses scissors to trim the excess stabilizer, and then rinses or soaks the design in water to finish the lace.  An alternative to soaking in water, is to use a heat tool (which looks similar to a soldering iron) to burn the excess stabilizer.  However, the heat tool should only be used with synthetic (rayon, polyester, etc) threads and fabrics, to prevent burning away your design.


Test stitching lace designs is recommended, since not every lacy looking embroidery has sufficient overlap of stitches to remain intact after washing away stabilizer.  Look for the acronym 'FSL' in the notes of pre-purchased designs when evaluating which designs to try with wash away stabilizer.  An internet site with a nice section of designs is www.suebox.com.  Here are some samples created by assorted digitizers that our presenters shared:


Using two sheet of stabilizer, with grain lines perpendicular (rotate one sheet of stabilizer 90 degrees before hooping), can help produce results that minimize distortion due to movement of the stabilizer in the hoop. One member offered that medical supply laundry bags were a cost effective alternative to commercial wash away stabilizers.


If you elect not to rinse away the stabilizer, you can create a lasting three dimensional lace sculpture.  These may be used as ornaments, bookmarks, purse/picture frame decorations.  If the stabilizer was to be rinsed from the above baby shoe, it would become a free standing lace baby sock. You may dampen a completed design, and then allow it to dry over a pencil to create a bend in your lace once it is dried.  Plastic canvass sheets that were meant for yarn cross stitch, can be handy drying racks for free standing lace.


Some free standing lace designs were created to include a mylar tissue paper applique; these designs have areas free of satin stitch, whose densely placed needle holes could tear the mylar.  Mylar is similar to the material of metal birthday balloons; you may see this material offered to crafters as 'embroidery film'.  This is a fun way to add the bling to your crafts that catches the attention of so many teens.  If you are interested in using this type of material for clothing, look for Angelina, which can be dry cleaned and pressed.  Angelina is available in threads, as well as sheets like mylar.


In addition to our creating a mylar design, as well as our choice of a butterfly, napkin, or snowflake ornament, we were treated to a demonstration of Embird embroidery editing and digitizing software.


We are grateful to our lovely volunteer presenters, Bev (left) and Dutch (right), as well as Princeton Chapter volunteers Rosemary, Lily, and Helen.  We also thank our caterer, Chris, for serving a delicious hot lunch followed by blueberry shortcake; and the Pemberton Library staff for providing space for this event.


Free standing lace can also be used to edge t-shirt necklines and lingerie, create jewelry, and be a good way to create a design with cut outs, like this candle sleeve above.  What will you create with free standing lace?

Thursday, July 4, 2013

Fun at Pemberton Library on July 2, 2013

One benefit of American Sewing Guild membership is you are welcome to attend any meeting.  I am happy to report that the lovely seamstresses of Browns Mills, New Jersey, made me feel like one of the girls.  Thank you for a wonderful night.

We were practicing use of our sergers by creating fabric rose pins, similar to those seen recently on ready to wear purses.  I must admit that I spent most of the night threading my machine, but I understand that is part of the learning curve.  Before the night was through, we agreed to serge as a group again.

Here is my final entry for the American Sewing Guild contest ending June 30, 2013.  I am looking forward to winning the Babylock serger that is self threading.

Tuesday, July 2, 2013

Tonight's Meeting of Hamilton Sewing Challenge American Sewing Guild Neighborhood Group was rescheduled for Thursday, August 1, 2013

Please mark your calendars and e-mail me to confirm you will be there.  Joen, our Browns Mills Neighborhood Group leader, is hosting a meeting tonight, so we will be sewing with her.  Have a blessed Independence Day!

Monday, July 1, 2013

Tomorrow's Meeting - UFO's - including dress from last meeting

I have a confession: I still did not finish the dress I started at our last meeting.  I have a feeling that I am not alone.  Our weather has been beautiful, and I have been spending more time outside.  Also, one of our American Sewing Guild members requested hand made items for her craft fair this month, and I could not resist that challenge.

Please let me know if you are planning to attend our meeting on July 2nd at the Hamilton Public Library, 6-8pm.  If you can't attend this month, we would like to see you at future meetings.  Your friends invited, too!

Wednesday, June 26, 2013

Love it when some one stops me to say she likes my creations

Simplicity 1885 - got a compliment on this dress today! How are your designs progressing? Next in person meeting of the Hamilton Sewing Challenge was changed to Tuesday, July 2, 6-8pm, at the Hamilton Public Library.

Tuesday, May 21, 2013

Easy Simplicity Sun Dress

Whip up this fast and easy sun dress in time for Memorial Day.  Our project this month starts with Simplicity Pattern 1885, which you can get from their website at www.simplicity.com/p-7458-misses-plus-size-sportswear.aspx or you can purchase at a local fabric shop.  Here is a summary of the instructions for our custom design:
Step 1: Position Piece #2-Back with center back seam 1/2" over fold.  This eliminates the center back seam, which is often used for fitting clothes constructed from woven fabric.


Step 2: Cut Piece #2.  Use safety pins to baste neck pleats.  Set aside.

Step 3: Position Piece #1-Front with center front cut line 1/2" over fabric fold.  Cut around pattern piece.  


Step 4: Use scissors to clip from center front neck to 1/4" diameter circle.

Step 5: Mark and pin neck pleats.  Set aside.

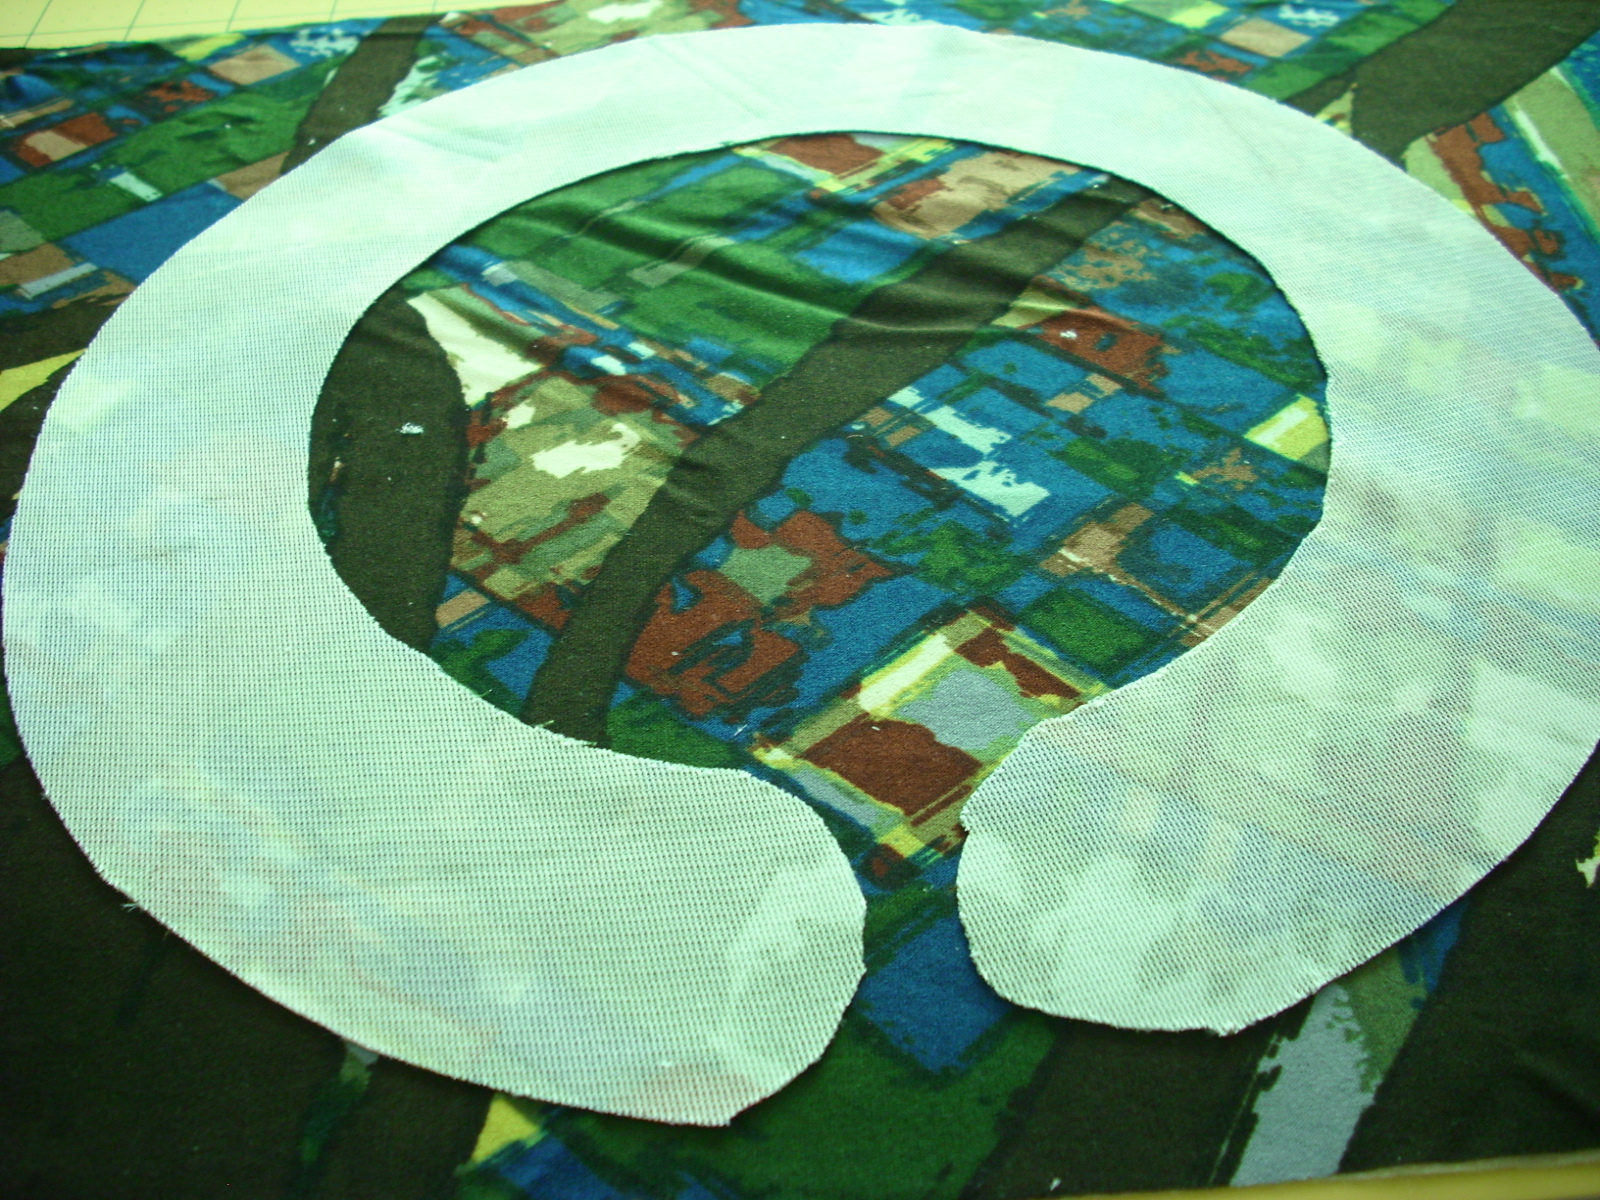
Step 6:  Cut two rectangles of fabric at least 11" on each side.  Use iron to apply Pellon EK 130 Easy Knit Interfacing to wrong sides.


Step 7: Cut a 10"-11" circle from one of the rectangles, then cut a 6" concentric circle from the same piece, creating a ring shape.

A fancy cutting guide like this works great, but tracing around dinner plates will also accomplish the task.

Step 8: Open the ring by using scissors to create two rounded edges.

Step 9: Place right side of open ring onto right side of rectangle. Pin and serge, leaving opening to turn.

Step 10: Turn collar right sides out, press and top stitch all around.

Step 11: Fuse interfacing around arm holes and neck line of front and back pieces.  Turn under fused areas and top stitch.


Step 12: Starting at underarms, serge each side seam.

Step 13: Try on dress or pin dress to dress form.  Pin collar to top of dress.  Top stitch where collar meets top of dress.  Sew button.


Step 14: Press up hem; top stitch and trim.

Supplies: Raglan sleeve dress pattern, approximately 3 yards knit fabric, approximately 1 yard fusible knit interfacing, button.